Thursday 26 December 2013

The Beautiful Design Winter 2013 Collection on Google Play

Posted by Marco Paglia, Android Design Team


While beauty’s in the eye of the beholder, designing apps for a platform also requires an attention to platform norms to ensure a great user experience. The Android Design site is an excellent resource for designers and developers alike to get familiar with Android’s visual, interaction, and written language. Many developers have taken advantage of the tools and techniques provided on the site, and every now and then we like to showcase a few notable apps that go above and beyond the guidelines.


This summer, we published the first Beautiful Design collection on Google Play. Today, we're refreshing the collection with a new set of apps just in time for the holiday season.


As a reminder, the goal of this collection is to highlight beautiful apps with masterfully crafted design details such as beautiful presentation of photos, crisp and meaningful layout and typography, and delightful yet intuitive gestures and transitions.


The newly updated Beautiful Design Winter 2013 collection includes:


Timely (by Bitspin), a clock app that takes animation to a whole new level. Screen transitions are liquid smooth and using the app feels more like playing with real objects than fussing around with knobs and buttons. If you’ve ever wondered if setting an alarm could be fun, Timely unequivocally answers “yes”.


Circa, a news reader that’s fast, elegant and full of beautiful design details throughout. Sophisticated typography and banner image effects, coupled with an innovative and "snappy" interaction, makes reading an article feel fast and very, very fun.


Etsy, an app that helps you explore a world of wonderful hand-crafted goods with thoughtfully designed screen transitions, beautifully arranged layouts, and subtle flourishes like a blur effect that lets you focus on the task at hand. This wonderfully detailed app is an absolute joy to use.


Airbnb, The Whole Pantry, Runtastic Heart Rate Pro, Tumblr, Umano, Yahoo! Weather… each with delightful design details.


Grand St. and Pinterest, veterans of the collection from this summer.


If you’re an Android developer, make sure to play with some of these apps to get a sense for the types of design details that can separate good apps from great ones. And remember to review the Android Design guidelines and the Android Design in Action video series for more ideas on how to design your next beautiful Android app.


Thursday 12 December 2013

Changes to the SecretKeyFactory API in Android 4.4

random_droid


In order to encrypt data, you need two things: some data to encrypt and an encryption key. The encryption key is typically a 128- or 256-bit integer. However, most people would rather use a short passphrase instead of a remembering a 78-digit number, so Android provides a way to generate an encryption key from ASCII text inside of javax.crypto.SecretKeyFactory.


Beginning with Android 4.4 KitKat, we’ve made a subtle change to the behavior of SecretKeyFactory. This change may break some applications that use symmetric encryption and meet all of the following conditions:


  1. Use SecretKeyFactory to generate symmetric keys, and

  2. Use PBKDF2WithHmacSHA1 as their key generation algorithm for SecretKeyFactory, and

  3. Allow Unicode input for passphrases


Specifically, PBKDF2WithHmacSHA1 only looks at the lower 8 bits of Java characters in passphrases on devices running Android 4.3 or below. Beginning with Android 4.4, we have changed this implementation to use all available bits in Unicode characters, in compliance with recommendations in PCKS #5.


Users using only ASCII characters in passphrases will see no difference. However, passphrases using higher-order Unicode characters will result in a different key being generated on devices running Android 4.4 and later.


For backward compatibility, we have added a new key generation algorithm which preserves the old behavior: PBKDF2WithHmacSHA1And8bit. Applications that need to preserve compatibility with older platform versions (pre API 19) and meet the conditions above can make use of this code:


import android.os.Build;

SecretKeyFactory factory;
if (Build.VERSION.SDK_INT >= Build.VERSION_CODES.KITKAT) {
// Use compatibility key factory -- only uses lower 8-bits of passphrase chars
factory = SecretKeyFactory.getInstance("PBKDF2WithHmacSHA1And8bit");
} else {
// Traditional key factory. Will use lower 8-bits of passphrase chars on
// older Android versions (API level 18 and lower) and all available bits
// on KitKat and newer (API level 19 and higher).
factory = SecretKeyFactory.getInstance("PBKDF2WithHmacSHA1");
}

Wednesday 11 December 2013

New Tools to Take Your Games to the Next Level


In this mobile world, games aren't just for the hardcore MMOG fan anymore, they're for everyone; in fact, three out of four people with an Android phone or tablet play games. If you're a game developer, Google has a host of tools available for you to help take your game to the next level, including Google Play game services, which let's you leverage Google's strength in mobile and cloud services so you can focus on building compelling game experiences for your users. Today, we're adding more tools to your gaming toolbox, like the open sourcing of a 2D physics library, as well as new features to the Google Play game services offering, like a plug-in for Unity.


LiquidFun, a rigid-body physics library with fluid simulation


First, we are announcing the open-source release of LiquidFun, a new C++ 2D physics library that makes it easier for developers to add realistic physics to their games.


Based on Box2D, LiquidFun features particle-based fluid simulation. Game developers can use it for new game mechanics and add realistic physics to game play. Designers can use the library to create beautiful fluid interactive experiences.


The video clip below shows a circular body falling into a viscous fluid using LiquidFun.


The LiquidFun library is written in C++, so any platform that has a C++ compiler can benefit from it. To help with this, we have provided a method to build the LiquidFun library, example applications, and unit tests for Android, Linux, OSX and Windows.


We’re looking forward to seeing what you’ll do with LiquidFun and we want to hear from you about how we can make this even better! Download the latest release from our LiquidFun project page on GitHub and join our discussion list!


Google Play Games plug-in for Unity


If you are a game developer using Unity, the cross-platform game engine from Unity Technologies, you can now more easily integrate game services using a new Google Play Games plug-in for Unity. This initial version of the plug-in supports sign-in, achievements, leaderboards and cloud save on Android and iOS. You can download the plug-in from the Play Games project page on GitHub, along with documentation and sample code.


New categories for games in Google Play


New game categories are coming to the Play Store in February 2014, such as Simulation, Role Playing, and Educational! Developers can now use the Google Play Developer Console to choose a new category for their apps if the Application Type is “Games”. The New Category field in the Store Listing will set the future category for your game. This will not change the category of your game on Google Play until the new categories go live in February 2014.


Wednesday 13 November 2013

Bring Your Apps into the Classroom, with Google Play for Education

Posted by Shazia Makhdumi, Head of Strategic EDU Partnerships, Google Play team


Google Play for Education has officially launched. It’s an extension of Google Play that’s designed for schools, simplifying discovery of educational apps and enabling developers and content providers to reach K-12 educators in the U.S. It offers bulk purchasing with purchase orders and instant distribution of educational apps, videos and other educational content to students' Android tablets via the cloud. Google Play for Education helps your apps gain visibility with the right audiences, without having to knock on school doors.


If you've built an Android app that would be awesome for schools—or even have an idea for one—now's the time to jump in. We'll put you one click away from getting purchased and installed by entire school districts. Class Dojo, Explain Everything, Nearpod, and Socrative are already getting discovered in Google Play for Education.


How to join Google Play for Education


If you already have an educational Android app you can use the Google Play Developer Console to mark your apps for inclusion in Google Play for Education. Marking your app identifies it as suitable for the US K-12 educational market and queues it for educator approval. These educators perform a first-pass qualification of apps, assigning the appropriate subject, grade, and common core standards metadata, while evaluating if the app meets the Google Play for Education criteria for classroom use.


Designing great apps for classrooms


High quality apps are top priority for teachers. Whether you already have an existing K-12 educational app or are looking to build one, take a look at our detailed requirements and guidelines—which we have compiled for you based on educator feedback—to ensure your app is appropriate for a K-12 environment. Also ensure that your app is optimized for both 7” and 10” Android tablets. Then, upload your new or updated app through the Developer Console, opt in to Google Play for Education, and publish. We will email you when your app has been evaluated.


For more information, please visit the Google Play for Education pages on the Android developer site. We are excited to be supporting schools to bring the best content and tools to their students. We look forward to seeing your app on Google Play for Education.


Monday 11 November 2013

Google Play App Translation Service

Posted by Ellie Powers, Google Play team


Today we are happy to announce that the App Translation Service, previewed in May at Google I/O, is now available to all developers. Every day, more than 1.5 million new Android phones and tablets around the world are turned on for the first time. Each newly activated Android device is an opportunity for you as a developer to gain a new user, but frequently, that user speaks a different language from you.


To help developers reach users in other languages, we launched the App Translation Service, which allows developers to purchase professional app translations through the Google Play Developer Console. This is part of a toolbox of localization features you can (and should!) take advantage of as you distribute your app around the world through Google Play.


We were happy to see that many developers expressed interest in the App Translation Service pilot program, and it has been well received by those who have participated so far, with many repeat customers.


Here are several examples from developers who participated in the App Translation Service pilot program: the developers of Zombie Ragdoll used this tool to launch their new game simultaneously in 20 languages in August 2013. When they combined app translation with local marketing campaigns, they found that 80% of their installs came from non-English-language users. Dating app SayHi Chat expanded into 13 additional languages using the App Translation Service. They saw 120% install growth in localized markets and improved user reviews of the professionally translated UI. The developer of card game G4A Indian Rummy found that the App Translation Service was easier to use than their previous translation methods, and saw a 300% increase with user engagement in localized apps. You can read more about these developers’ experiences with the App Translation Service in Developer Stories: Localization in Google Play.


To use the App Translation Service, you’ll want to first read the localization checklist. You’ll need to get your APK ready for translation, and select the languages to target for translation. If you’re unsure about which languages to select, Google Play can help you identify opportunities. First, review the Statistics section in the Developer Console to see where your app has users already. Does your app have a lot of installs in a certain country where you haven’t localized to their language? Are apps like yours popular in a country where your app isn’t available yet? Next, go to the Optimization Tips section in the Developer Console to make sure your APK, store listing, and graphics are consistently translated.


You’ll find the App Translation Service in the Developer Console at the bottom of the APK section — you can start a new translation or manage an existing translation here. You’ll be able to upload your app’s file of string resources, select the languages you want to translate into, select a professional translation vendor, and place your order. Pro tip: you can put your store listing text into the file you upload to the App Translation Service. You’ll be able to communicate with your translator to be sure you get a great result, and download your translated string files. After you do some localization testing, you’ll be ready to publish your newly translated app update on Google Play — with localized store listing text and graphics. Be sure to check back to see the results on your user base, and track the results of marketing campaigns in your new languages using Google Analytics integration.


Good luck! Bonne chance ! ご幸運を祈ります! 행운을 빌어요 ¡Buena suerte! Удачи! Boa Sorte!


Thursday 31 October 2013

Android 4.4 KitKat and Updated Developer Tools

Posted by Dave Burke, Engineering Director, Android Platform


Today we are announcing Android 4.4 KitKat, a new version of Android that brings great new features for users and developers.


The very first device to run Android 4.4 is the new Nexus 5, available today on Google Play, and coming soon to other retail outlets. We’ll also be rolling out the Android 4.4 update worldwide in the next few weeks to all Nexus 4, Nexus 7, and Nexus 10 devices, as well as the Samsung Galaxy S4 and HTC One Google Play Edition devices.


As part of this release, we kicked off Project Svelte, an effort to reduce the memory needs of Android so that it can run on a much broader range of devices, including entry-level devices that have as little as 512MB RAM. From the kernel to system, frameworks, and apps, we've reduced memory footprint and improved memory management so Android can run comfortably on only 512MB of RAM. We did this not only on Android but across Google apps, like Chrome and YouTube.


By supporting a broader range of devices, Android 4.4 will help move the Android ecosystem forward. Now all users will be able to enjoy the very best that Android has to offer, on the devices that best meet their needs.


Here’s a quick look at some of the new features for developers:


  • New ways to create beautiful apps — A new full-screen immersive mode lets your app or game use every pixel on the screen to showcase content and capture touch events. A new transitions framework makes it easier to animate the states in your UI. Web content can take advantage of a completely new implementation of WebView built on Chromium.


  • More useful than ever — A printing framework lets you add the convenience of printing to your apps. A storage access framework makes it easier for users find documents, photos, and other data across their local and cloud-based storage services. You can integrate your app or storage service with the framework to give users instant access to their data.


  • Low-power sensors — New hardware-integrated sensors let you add great new features to your apps without draining the battery. Included are a step detector and step counter that let you efficiently track of the number of walking steps, even when the screen is off.


  • New media capabilities — A new screen recorder lets you capture high-quality video of your app directly from your Android device. It's a great new way to create walkthroughs, tutorials, marketing videos, and more. Apps can use adaptive playback to offer a significantly better streaming video experience.


  • RenderScript in the NDK — A new C++ API in the Android Native Development Kit (NDK) lets you use RenderScript from your native code, with access to script intrinsics, custom kernels, and more.


  • Improved accessibility support — New system-wide captioning settings let your apps present closed captions in the style that's preferred by the user.


There's a lot more, so be sure to check out the Android 4.4 platform highlights for a complete overview of those and other new capabilities for developers. For details on the APIs and how to use them, take a look at the API Overview or watch one of the new DevBytes videos on KitKat.


Along with the new Android 4.4 platform we're releasing a new version of the Android NDK (r9b). The new NDK gives you native access to RenderScript and other stable APIs in Android 4.4, so if you've been waiting to use RenderScript from your native code, give it a try.


Last, we've updated the Support Package (r19) with a new helper library for printing images through the new printing framework, as well as other updates.


You can get started developing and testing on Android 4.4 right away, in Android Studio or in ADT/Ant. You can download the Android 4.4 Platform (API level 19), as well as the SDK Tools, Platform Tools, and Support Package from the Android SDK Manager.


Google Play Services 4.0

Today we're launching a new release of Google Play services. Version 4.0 includes the Google Mobile Ads SDK, and offers improvements to geofencing, Google+, and Google Wallet Instant Buy APIs.


With over 97% of devices now running Android 2.3 (Gingerbread) or newer platform versions, we’re dropping support for Froyo from this release of the Google Play services SDK in order to make it possible to offer more powerful APIs in the future. That means you will not be able to utilize these new APIs on devices running Android 2.2 (Froyo).


We’re still in the process of rolling out to Android devices across the world, but you can already download the latest Google Play services SDK and start developing against the new APIs using the new Android 4.4 (KitKat) emulator.


Google Mobile Ads


If you’re using AdMob to monetize your apps, the new Google Mobile Ads SDK in Google Play services helps provide seamless improvements to your users. For example, bug fixes get pushed automatically to users without you having to do anything. Check out the post on the Google Ads Developer Blog for more details.


Maps and Location Based Services


The Maps and Geofencing APIs that launched in Google Play services 3.1 have been updated to improve overall battery efficiency and responsiveness.


You can save power by requesting larger latency values for notifications alerting your app to users entering or exiting geofences, or request that entry alerts are sent only after a user stays within a geofence for a specified period of time. Setting generous dwell times helps to eliminate unwanted notifications when a user passes near a geofence or their location is seen to move across a boundary.


The Maps API enhances map customization features, letting you specify marker opacity, fade-in effects, and visibility of 3D buildings. It’s also now possible to change ground overlay images.


Google+ and Google Wallet Instant Buy


Apps that are enabled with Google+ Sign-In will be updated with a simplified sign-in consent dialog. Google Wallet Instant Buy APIs are now available to everyone to try out within a sandbox, with a simplified API that streamlines the buy-flow and reduces integration time.


Google Wallet Instant Buy also includes new Wallet Objects, which means you can award loyalty points to a user's saved rewards program ID for each applicable Google Wallet Instant Buy purchase.


New user control over advertising identifier


To give users better controls and to provide you with a simple, standard system to continue to monetize your apps, this update contains a new, anonymous identifier for advertising purposes (to be used in place of Android ID). Google Settings now includes user controls that enable users to reset this identifier, or opt out of interest-based ads for Google Play apps.


More About Google Play Services


To learn more about Google Play services and the APIs available to you through it, visit the Google Services area of the Android Developers site.


Making your App Content more Accessible from Google

Posted by Chaesang Jung, Software Engineer


There are many reasons to build or not to build a mobile app as part of your broader mobile strategy. For instance, while apps offer a rich user experience, users can’t access them through Google Search like they do websites. Today, we’re announcing a new Google Search capability, app indexing, that will start to make apps more accessible through Google on Android.


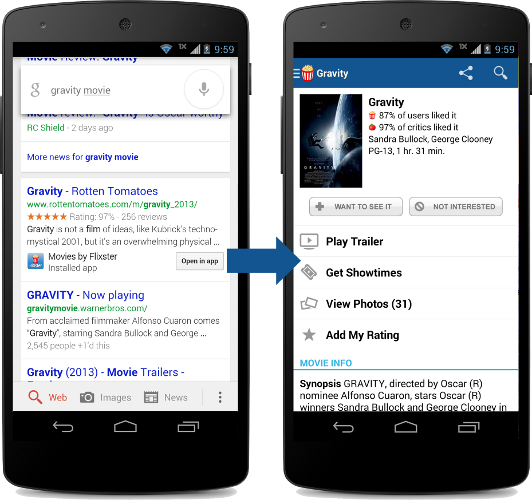
Let’s say that a user is searching for a movie. With app indexing, Google will begin to include deep links to apps in Android search results. When the user taps on the “Open in app” deep links, the app opens up directly to the movie in question.


In this example, in order for the app deep links to appear in search results,


  • The Flixster app supports deep linking

  • The Rotten Tomatoes website has specified that the Flixster app page is an alternate for the web page

  • Google has indexed the Flixster app to determine relevance

  • The user has installed the Flixster app


The end result is that users will have a seamless search experience when accessing your app content through Google.


Google is currently testing app indexing with an initial group of developers including AllTheCooks, AllTrails, Beautylish, Etsy, Expedia, Flixster, Healthtap, IMDb, moviefone, newegg, OpenTable, Trulia, and Wikipedia. Deep links for these applications will start to appear in Google search results on Android, in the US, in a few weeks.


How to get started


If you are interested in enabling indexing for your Android app, you can learn more about our developer guidelines at developers.google.com/app-indexing and sign up. We are expanding our app indexing efforts and will gradually include more developers over time.


Monday 14 October 2013

Getting Your SMS Apps Ready for KitKat


Posted by Scott Main and David Braun


Sending and receiving SMS messages are fundamental features on mobile devices and many developers have built successful apps that enhance this experience on Android. Some of you have built SMS apps using hidden APIs—a practice we discourage because hidden APIs may be changed or removed and new devices are not tested against them for compatibility. So, to provide you with a fully supported set of APIs for building SMS apps and to make the user experience for messaging more predictable, Android 4.4 (KitKat) makes the existing APIs public and adds the concept of a default SMS app, which the user can select in system settings.


This means that if you are using the hidden SMS APIs on previous platform versions,
you need to make some adjustments so your app continues to work when Android 4.4 is released later this year.


Make your app the default SMS app


On Android 4.4, only one app can receive the new SMS_DELIVER_ACTION intent, which the system
broadcasts when a new SMS message arrives. Which app receives this broadcast is determined by
which app the user has selected as the default SMS app in system settings. Likewise, only the
default SMS app receives the new WAP_PUSH_DELIVER_ACTION intent when a new MMS arrives.


Other apps that only want to read new messages can instead receive the SMS_RECEIVED_ACTION broadcast intent when a new SMS arrives. However, only the app that receives the SMS_DELIVER_ACTION broadcast (the user-specified default SMS app) is able to write to the SMS Provider defined by the android.provider.Telephony class and subclasses. As such, it's important that you update your messaging app as soon as possible to be available as a default SMS app, because although your existing app won't crash on an Android 4.4 device, it will silently fail when attempting to write to the SMS Provider.


In order for your app to appear in the system settings as an eligible default SMS app, your manifest file must declare some specific capabilities. So you must update your app to do the following things:


  • In a broadcast receiver, include an intent filter for SMS_DELIVER_ACTION ("android.provider.Telephony.SMS_DELIVER"). The broadcast receiver must also require the BROADCAST_SMS permission.

    This allows your app to directly receive incoming SMS messages.


  • In a broadcast receiver, include an intent filter for WAP_PUSH_DELIVER_ACTION ("android.provider.Telephony.WAP_PUSH_DELIVER") with the MIME type "application/vnd.wap.mms-message". The broadcast receiver must also require the BROADCAST_WAP_PUSH permission.

    This allows your app to directly receive incoming MMS messages.


  • In your activity that delivers new messages, include an intent filter for ACTION_SENDTO ("android.intent.action.SENDTO") with schemas, sms:, smsto:, mms:, and mmsto:.

    This allows your app to receive intents from other apps that want to deliver a message.


  • In a service, include an intent filter for ACTION_RESPONSE_VIA_MESSAGE ("android.intent.action.RESPOND_VIA_MESSAGE") with schemas, sms:, smsto:, mms:, and mmsto:. This service must also require the SEND_RESPOND_VIA_MESSAGE permission.

    This allows users to respond to incoming phone calls with an immediate text message using your app.


For example, here's a manifest file with the necessary components and intent filters:


<manifest>
...
<application>
<!-- BroadcastReceiver that listens for incoming SMS messages -->
<receiver android:name=".SmsReceiver"
android:permission="android.permission.BROADCAST_SMS">
<intent-filter>
<action android:name="android.provider.Telephony.SMS_DELIVER" />
</intent-filter>
</receiver>

<!-- BroadcastReceiver that listens for incoming MMS messages -->
<receiver android:name=".MmsReceiver"
android:permission="android.permission.BROADCAST_WAP_PUSH">
<intent-filter>
<action android:name="android.provider.Telephony.WAP_PUSH_DELIVER" />
<data android:mimeType="application/vnd.wap.mms-message" />
</intent-filter>
</receiver>

<!-- Activity that allows the user to send new SMS/MMS messages -->
<activity android:name=".ComposeSmsActivity" >
<intent-filter>
<action android:name="android.intent.action.SEND" />
<action android:name="android.intent.action.SENDTO" />
<category android:name="android.intent.category.DEFAULT" />
<category android:name="android.intent.category.BROWSABLE" />
<data android:scheme="sms" />
<data android:scheme="smsto" />
<data android:scheme="mms" />
<data android:scheme="mmsto" />
</intent-filter>
</activity>

<!-- Service that delivers messages from the phone "quick response" -->
<service android:name=".HeadlessSmsSendService"
android:permission="android.permission.SEND_RESPOND_VIA_MESSAGE"
android:exported="true" >
<intent-filter>
<action android:name="android.intent.action.RESPOND_VIA_MESSAGE" />
<category android:name="android.intent.category.DEFAULT" />
<data android:scheme="sms" />
<data android:scheme="smsto" />
<data android:scheme="mms" />
<data android:scheme="mmsto" />
</intent-filter>
</service>
</application>
</manifest>


Any filters for the SMS_RECEIVED_ACTION broadcast in existing apps will continue to work the same on Android 4.4, but only as an observer of new messages, because unless your app also receives the SMS_DELIVER_ACTION broadcast, you cannot write to the SMS Provider on Android 4.4.


Beginning with Android 4.4, you should stop listening for the SMS_RECEIVED_ACTION broadcast, which you can do at runtime by checking the platform version then disabling your broadcast receiver for SMS_RECEIVED_ACTION with PackageManager.setComponentEnabledSetting(). However, you can continue listening for that broadcast if your app needs only to read special SMS messages, such as to perform phone number verification. Note that—beginning with Android 4.4—any attempt by your app to abort the SMS_RECEIVED_ACTION broadcast will be ignored so all apps interested have the chance to receive it.


Tip: To distinguish the two SMS broadcasts, imagine that the SMS_RECEIVED_ACTION simply says "the system received an SMS," whereas the SMS_DELIVER_ACTION says "the system is delivering your app an SMS, because you're the default SMS app."


Disable features when not the default SMS app


In consideration of some apps that do not want to behave as the default SMS app but still want to send messages, any app that has the SEND_SMS permission is still able to send SMS messages using SmsManager. If and only if an app is not selected as the default SMS app on Android 4.4, the system automatically writes the sent SMS messages to the SMS Provider (the default SMS app is always responsible for writing its sent messages to the SMS Provider).


However, if your app is designed to behave as the default SMS app, then while your app is not selected as the default, it's important that you understand the limitations placed upon your app and disable features as appropriate. Although the system writes sent SMS messages to the SMS Provider while your app is not the default SMS app, it does not write sent MMS messages and your app is not able to write to the SMS Provider for other operations, such as to mark messages as draft, mark them as read, delete them, etc.


So when your messaging activity resumes, check whether your app is the default SMS app by querying Telephony.Sms.getDefaultSmsPackage(), which returns the package name of the current default SMS app. If it doesn't match your package name, disable features such as the ability for users to send new messages.


When the user decides to use your app for messaging, you can display a dialog hosted by the system that allows the user to make your app the default SMS app. To display the dialog, call startActivity() with the Telephony.Sms.Intents.ACTION_CHANGE_DEFAULT intent, including an extra with the Sms.Intents.EXTRA_PACKAGE_NAME key and your package name as the string value.


For example, your activity might include code like this:


public class ComposeSmsActivity extends Activity {

@Override
protected void onResume() {
super.onResume();

final String myPackageName = getPackageName();
if (!Telephony.Sms.getDefaultSmsPackage(this).equals(myPackageName)) {
// App is not default.
// Show the "not currently set as the default SMS app" interface
View viewGroup = findViewById(R.id.not_default_app);
viewGroup.setVisibility(View.VISIBLE);

// Set up a button that allows the user to change the default SMS app
Button button = (Button) findViewById(R.id.change_default_app);
button.setOnClickListener(new View.OnClickListener() {
public void onClick(View v) {
Intent intent =
new Intent(Telephony.Sms.Intents.ACTION_CHANGE_DEFAULT);
intent.putExtra(Telephony.Sms.Intents.EXTRA_PACKAGE_NAME,
myPackageName);
startActivity(intent);
}
});
} else {
// App is the default.
// Hide the "not currently set as the default SMS app" interface
View viewGroup = findViewById(R.id.not_default_app);
viewGroup.setVisibility(View.GONE);
}
}
}


Advice for SMS backup & restore apps


Because the ability to write to the SMS Provider is restricted to the app the user selects as the default SMS app, any existing app designed purely to backup and restore SMS messages will currently be unable to restore SMS messages on Android 4.4. An app that backs up and restores SMS messages must also be set as the default SMS app so that it can write messages in the SMS Provider. However, if the app does not also send and receive SMS messages, then it should not remain set as the default SMS app. So, you can provide a functional user experience with the following design when the user opens your app to initiate a one-time restore operation:


  1. Query the current default SMS app's package name and save it.
    String defaultSmsApp = Telephony.Sms.getDefaultSmsPackage(context);


  2. Request the user change the default SMS app to your app in order to restore SMS messages (you must be the default SMS app in order to write to the SMS Provider).
    Intent intent = new Intent(context, Sms.Intents.ACTION_CHANGE_DEFAULT);
    intent.putExtra(Sms.Intents.EXTRA_PACKAGE_NAME, context.getPackageName());
    startActivity(intent);


  3. When you finish restoring all SMS messages, request the user to change the default SMS app back to the previously selected app (saved during step 1).
    Intent intent = new Intent(context, Sms.Intents.ACTION_CHANGE_DEFAULT);
    intent.putExtra(Sms.Intents.EXTRA_PACKAGE_NAME, defaultSmsApp);
    startActivity(intent);


Prepare to update your SMS app


We encourage you to update your apps as soon as possible to provide your users the best experience on Android. To help you make the changes, we'll soon be providing the necessary SDK components for Android 4.4 that allow you to compile and test your changes on Android 4.4. Stay tuned!

Friday 11 October 2013

Tablet changes in Google Play

Posted by Ellie Powers, Google Play team


Fueled by the Nexus 7 and other great devices, more than 70 million Android tablets have been activated. Thousands of developers have already designed their apps to look great on tablets, and with the holidays fast approaching, we’re making it even easier for the next wave of tablet owners to discover great apps and games.


Play Store tablet changes coming up on November 21


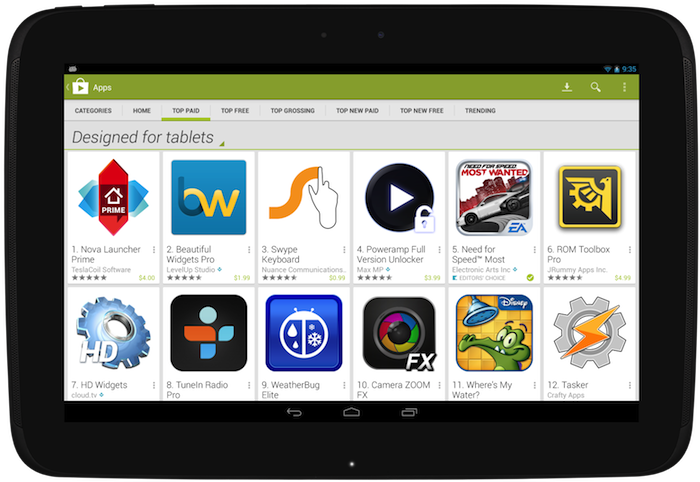
Last year, Google Play added a “designed for tablets” section, where users could easily discover apps that look great on their 7”- and 10”-tablets. This section includes only apps and games which meet criteria and guidelines we established last year. (Here’s an overview if you missed it.) Developers who invest the time to meet the criteria are seeing great results; take Remember The Milk, which saw an 83% increase in tablet downloads from being in this section. (see the whole story here).


On November 21 2013, the Play Store made a series of changes so it’s even easier for tablet users to find those apps that are best for their devices. First, by default, users browsing Google Play on a tablet will now see apps and games that are designed for tablets on the top lists (Top Paid, Top Free, Top Grossing, Top New Paid, Top New Free, and Trending). Tablet users will still be able to switch the view so they can see all apps or games if they choose. Also starting November 21, apps and games that do not meet the “designed for tablets” criteria will be marked as “designed for phones” for users who browse the Play Store on tablets.


You’ll want to make sure that your app is designed for tablets; read more about how to do this at the end of this blog post.


Make sure your app is ready!


If you want to be sure your app is included in the “Designed for tablets” view, go to the Developer Console to check your tablet optimization tips. If you see any issues listed there, you’ll need to address them in your app and upload a new binary for distribution. If there are no issues listed, your app is eligible to be included in the “Designed for tablets" view in the top lists.


Also, make sure to read the full tablet quality checklist to understand how to build outstanding tablet experiences.


Everyday, thousands of Android developers are taking advantage of the tremendous Android tablet opportunity. The flood of new users coupled with the increased screen size means new user experiences, more engagement and more monetization opportunities. We’re excited to see what you do!


Tuesday 8 October 2013

New Developer Features in Google Play Games

Posted by Greg Hartrell, Google Play Games team


Mobile games are on fire right now; in fact, three out of every four Android users are playing games. Earlier in the year we launched Google Play Games — Google’s platform for gaming across Android, iOS, and the web — to help you take advantage of this wave of users. Building on Google Play Services, you can quickly add new social features to your games, for richer game experiences that drive user acquisition and engagement across platforms.


Today we’re announcing three new features in Google Play Games that make it easier to understand what players are doing in your game, manage your game features more effectively, and store more game data in the Google cloud.


Game services statistics in the Developer Console


Now you can see stats about your game’s player activity in Google Play Games right in the Google Play Developer Console. You can see how many players have signed into your game through Google, the percentage of players who unlocked an achievement, and how many scores are posted to your leaderboards.


Game services alerts in the Developer Console


Did you mangle the ID for an achievement or leaderboard? Forget to hit the publish button? Do you know if your game is getting throttled because you accidentally called a method in a tight loop? Fear not! New alerts will now show up in the Developer Console to warn you when these mistakes happen, and guide you quickly to the answers on how to fix them.


Double your Cloud Save storage


Cloud Save is one of our most popular features for game developers, providing up to 512KB of data per user, per game, since it was introduced. You asked for more storage, and we are delivering on that request. Starting October 14th, 2013, you’ll be able to store up to 256KB per slot, for a total of 1MB per user. Game saves have never been happier!


More about Google Play Games


If you want learn more about what Google Play Games offers and how to get started, take a look at the Google Play Games Services developer documentation.

Thursday 3 October 2013

Improved App Insight by Linking Google Analytics with Google Play

Posted by Ellie Powers, Google Play team


A key part of growing your app’s installed base is knowing more about your users — how they discover your app, what devices they use, what they do when they use your app, and how often they return to it. Understanding your users is now made easier through a new integration between Google Analytics and the Google Play Developer Console.


Starting today, you can link your Google Analytics account with your Google Play Developer Console to get powerful new insights into your app’s user acquisition and engagement. In Google Analytics, you’ll get a new report highlighting which campaigns are driving the most views, installs, and new users in Google Play. In the Developer Console, you’ll get new app stats that let you easily see your app’s engagement based on Analytics data.


This combined data can help you take your app business to the next level, especially if you’re using multiple campaigns or monetizing through advertisements and in-app products that depend on high engagement. Linking Google Analytics to your Developer Console is straightforward — the sections below explain the new types of data you can get and how to get started.


In Google Analytics, see your app’s Google Play referral flow


Once you’ve linked your Analytics account to your Developer Console, you’ll see a new report in Google Analytics called Google Play Referral Flow. This report details each of your campaigns and the user traffic that they drive. For each campaign, you can see how many users viewed listing page in Google Play and how many went on to install your app and ultimately launch it on their mobile devices.


With this data you can track the effectiveness of a wide range of campaigns — such as blogs, news articles, and ad campaigns — and get insight into which marketing activities are most effective for your business. You can find the Google Play report by going to Google Analytics and clicking on Acquisitions > Google Play > Referral Flow.


In the Developer Console, see engagement data from Google Analytics


If you’re already using Google Analytics, you know how important it is to see how users are interacting with your app. How often do they launch it? How much do they do with it? What are they doing inside the app?


Once you link your Analytics account, you’ll be able to see your app’s engagement data from Google Analytics right in the Statistics page in your Developer Console. You’ll be able to select two new metrics from the drop-down menu at the top of the page:


  • Active users: the number of users who have launched your app that day

  • New users: the number of users who have launched your app for the first time that day


These engagement metrics are integrated with your other app statistics, so you can analyze them further across other dimensions, such as by country, language, device, Android version, app version, and carrier.


How to get started


To get started, you first need to integrate Google Analytics into your app. If you haven’t done this already, download the Google Analytics SDK for Android and then take a look at the developer documentation to learn how to add Analytics to your app. Once you’ve integrated Analytics into your app, upload the app to the Developer Console.


Next, you’ll need to link your Developer Console to Google Analytics. To do this, go to the Developer Console and select the app. At the bottom of the Statistics page, you’ll see directions about how to complete the linking. The process takes just a few moments.


That’s it! You can now see both the Google Play Referral Flow report in Google Analytics and the new engagement metrics in the Developer Console.


Thursday 26 September 2013

Using the Hardware Scaler for Performance and Efficiency

Posted by Hak Matsuda and Dirk Dougherty, Android Developer Relations team


If you develop a performance-intensive 3D game, you’re always looking for ways to give users richer graphics, higher frame rates, and better responsiveness. You also want to conserve the user’s battery and keep the device from getting too warm during play. To help you optimize in all of these areas, consider taking advantage of the hardware scaler that’s available on almost all Android devices in the market today.


How it works and why you should use it


Virtually all modern Android devices use a CPU/GPU chipset that includes a hardware video scaler. Android provides the higher-level integration and makes the scaler available to apps through standard Android APIs, from Java or native (C++) code. To take advantage of the hardware scaler, all you have to do is render to a fixed-size graphics buffer, rather than using the system-provided default buffers, which are sized to the device's full screen resolution.


When you render to a fixed-size buffer, the device hardware does the work of scaling your scene up (or down) to match the device's screen resolution, including making any adjustments to aspect ratio. Typically, you would create a fixed-size buffer that's smaller than the device's full screen resolution, which lets you render more efficiently — especially on today's high-resolution screens.


Using the hardware scaler is more efficient for several reasons. First, hardware scalers are extremely fast and can produce great visual results through multi-tap and other algorithms that reduce artifacts. Second, because your app is rendering to a smaller buffer, the computation load on the GPU is reduced and performance improves. Third, with less computation work to do, the GPU runs cooler and uses less battery. And finally, you can choose what size rendering buffer you want to use, and that buffer can be the same on all devices, regardless of the actual screen resolution.


Optimizing the fill rate


In a mobile GPU, the pixel fill rate is one of the major sources of performance bottlenecks for performance game applications. With newer phones and tablets offering higher and higher screen resolutions, rendering your 2D or 3D graphics on those those devices can significantly reduce your frame rate. The GPU hits its maximum fill rate, and with so many pixels to fill, your frame rate drops.


style="border-radius: 6px;padding:0;margin:0;" />

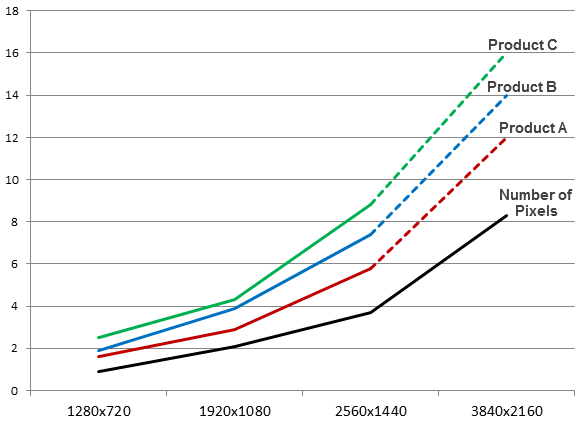
Power consumed in the GPU at different rendering resolutions, across several popular chipsets in use on Android devices. (Data provided by Qualcomm).


To avoid these bottlenecks, you need to reduce the number of pixels that your game is drawing in each frame. There are several techniques for achieving that, such as using depth-prepass optimizations and others, but a really simple and effective way is making use of the hardware scaler.


Instead of rendering to a full-size buffer that could be as large as 2560x1600, your game can instead render to a smaller buffer — for example 1280x720 or 1920x1080 — and let the hardware scaler expand your scene without any additional cost and minimal loss in visual quality.


Reducing power consumption and thermal effects


A performance-intensive game can tend to consume too much battery and generate too much heat. The game’s power consumption and thermal conditions are important to users, and they are important considerations to developers as well.


As shown in the diagram, the power consumed in the device GPU increases significantly as rendering resolution rises. In most cases, any heavy use of power in GPU will end up reducing battery life in the device.


In addition, as CPU/GPU rendering load increases, heat is generated that can make the device uncomfortable to hold. The heat can even trigger CPU/GPU speed adjustments designed to cool the CPU/GPU, and these in turn can throttle the processing power that’s available to your game.


For both minimizing power consumption and thermal effects, using the hardware scaler can be very useful. Because you are rendering to a smaller buffer, the GPU spends less energy rendering and generates less heat.


Accessing the hardware scaler from Android APIs


Android gives you easy access to the hardware scaler through standard APIs, available from your Java code or from your native (C++) code through the Android NDK.


All you need to do is use the APIs to create a fixed-size buffer and render into it. You don’t need to consider the actual size of the device screen, however in cases where you want to preserve the original aspect ratio, you can either match the aspect ratio of the buffer to that of the screen, or you can adjust your rendering into the buffer.


From your Java code, you access the scaler through SurfaceView, introduced in API level 1. Here’s how you would create a fixed-size buffer at 1280x720 resolution:


surfaceView = new GLSurfaceView(this);
surfaceView.getHolder().setFixedSize(1280, 720);


If you want to use the scaler from native code, you can do so through the NativeActivity class, introduced in Android 2.3 (API level 9). Here’s how you would create a fixed-size buffer at 1280x720 resolution using NativeActivity:


int32_t ret = ANativeWindow_setBuffersGeometry(window, 1280, 720, 0);


By specifying a size for the buffer, the hardware scaler is enabled and you benefit in your rendering to the specified window.


Choosing a size for your graphics buffer


If you will use a fixed-size graphics buffer, it's important to choose a size that balances visual quality across targeted devices with performance and efficiency gains.


For most performance 3D games that use the hardware scaler, the recommended size for rendering is 1080p. As illustrated in the diagram, 1080p is a sweet spot that balances a visual quality, frame rate, and power consumption. If you are satisfied with 720p, of course you can use that size for even more efficient operations.


More information


If you’d like to take advantage of the hardware scaler in your app, take a look at the class documentation for SurfaceView or NativeActivity, depending on whether you are rendering through the Android framework or native APIs.

Watch for sample code on using the hardware scaler coming soon!

Wednesday 18 September 2013

RenderScript in the Android Support Library


Renderscript Support library on devicesstyle="border-radius: 6px;padding:0;margin:0;" />

The RenderScript Support Library lets you take advantage of the latest RenderScript features on devices running Android 2.2 and later.


Posted by Tim Murray, Android RenderScript team

One of the requests we hear most commonly from developers is to enable more devices to run the latest features of RenderScript. Over the past several releases of Android, we’ve added a ton of functionality to the RenderScript runtime, but the runtime's dependence on the core Android platform version has limited the range of devices that can support that new functionality. We’ve been working on a solution to this since last year, and we’re now ready to share it with all Android developers.


Today we're announcing a new RenderScript Support Library and updated SDK tools that together let you take advantage of RenderScript on plaform versions all the way back to Android 2.2 (Froyo).

With ADT v22.2, SDK Tools v22.2, and Android Build Tools v18.1.0, apps targeting Android 2.2 and later can now make use of almost all of the functionality available natively in RenderScript with Android 4.3. This includes access to the newest RenderScript features such as high-performance intrinsics and the new performance optimizations available to scripts.


Using the RenderScript Support Library


Using the RenderScript Support Library is straightforward. Once you've updated ADT and your SDK tools, there are only two things that you have to do to start using Renderscript in your apps:


  1. In your classes that use RenderScript, import the RenderScript Support Library from android.support.v8.renderscript. If you are already using native RenderScript, you can change your import from android.renderscript to android.support.v8.renderscript.

    import android.support.v8.renderscript.*;


  2. In your project.properties, make sure you’re targeting android-18 and add the following lines:

    renderscript.target=18
    renderscript.support.mode=true
    sdk.buildtools=18.1.0


That’s it! With the RenderScript Support Library, you can continue to use the same APIs from your app as with the native RenderScript package (with a few minor exceptions that we’ll talk about below), and you can use the same features in your own scripts as you would with the latest RenderScript toolchain.

For complete details on how to set up the RenderScript Support Library, see Accessing RenderScript Java APIs.


API and Implementation details


If you'd like to use RenderScript Support Library in your app, there are few things you should know:


  • First, the RenderScript Support Library supports almost all of the RenderScript API functions as the native API that's available in API level and higher. The one notable exception is that Allocation.USAGE_IO_INPUT and Allocation.USAGE_IO_OUTPUT are not currently available in the RenderScript Support Library.


  • Second, devices running Android 4.2 and earlier will always run their RenderScript applications on the CPU, while devices running Android 4.3 or later will run their RenderScript applications on whatever processors are available on that particular device. Because the Support Library versions of the scripts have to be precompiled to support all possible platforms, there is a performance hit when running the precompiled scripts compared to runtime compilation on Android 4.3 due to more restrictions on compiler optimizations.


We’re really pleased with how the RenderScript Support Library has turned out. We've already seen how it performs in a shipping app — it's been part of the photo editor in the Google+ Android app since May 2013, and it’s definitely proven itself in a large and widely used application. We hope you’ll be happy with it too.


Thursday 29 August 2013

RenderScript Intrinsics


Posted by R. Jason Sams, Android RenderScript Tech Lead


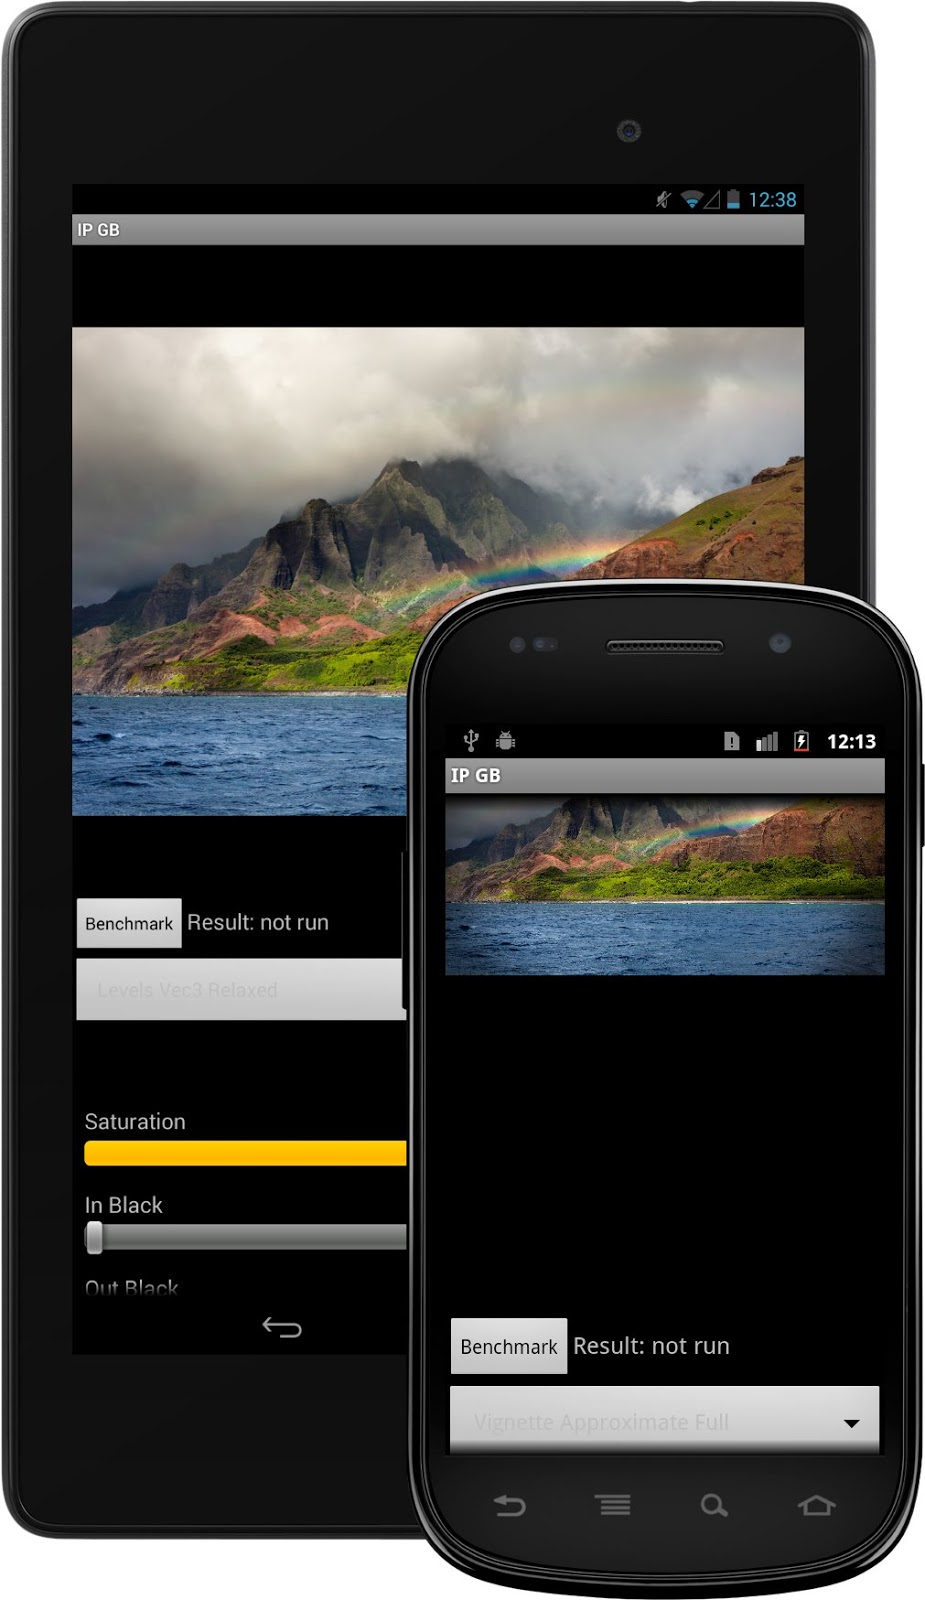
RenderScript has a very powerful ability called Intrinsics. Intrinsics are built-in functions that perform well-defined operations often seen in image processing. Intrinsics can be very helpful to you because they provide extremely high-performance implementations of standard functions with a minimal amount of code.


RenderScript intrinsics will usually be the fastest possible way for a developer to perform these operations. We’ve worked closely with our partners to ensure that the intrinsics perform as fast as possible on their architectures — often far beyond anything that can be achieved in a general-purpose language.


Table 1. RenderScript intrinsics and the operations they provide.


NameOperation
ScriptIntrinsicConvolve3x3, ScriptIntrinsicConvolve5x5Performs a 3x3 or 5x5 convolution.
ScriptIntrinsicBlurPerforms a Gaussian blur. Supports grayscale and RGBA buffers and is used by the system framework for drop shadows.
ScriptIntrinsicYuvToRGBConverts a YUV buffer to RGB. Often used to process camera data.
ScriptIntrinsicColorMatrixApplies a 4x4 color matrix to a buffer.
ScriptIntrinsicBlendBlends two allocations in a variety of ways.
ScriptIntrinsicLUTApplies a per-channel lookup table to a buffer.
ScriptIntrinsic3DLUTApplies a color cube with interpolation to a buffer.


Your application can use one of these intrinsics with very little code. For example, to perform a Gaussian blur, the application can do the following:


RenderScript rs = RenderScript.create(theActivity);
ScriptIntrinsicBlur theIntrinsic = ScriptIntrinsicBlur.create(mRS, Element.U8_4(rs));;
Allocation tmpIn = Allocation.createFromBitmap(rs, inputBitmap);
Allocation tmpOut = Allocation.createFromBitmap(rs, outputBitmap);
theIntrinsic.setRadius(25.f);
theIntrinsic.setInput(tmpIn);
theIntrinsic.forEach(tmpOut);
tmpOut.copyTo(outputBitmap);


This example creates a RenderScript context and a Blur intrinsic. It then uses the intrinsic to perform a Gaussian blur with a 25-pixel radius on the allocation. The default implementation of blur uses carefully hand-tuned assembly code, but on some hardware it will instead use hand-tuned GPU code.


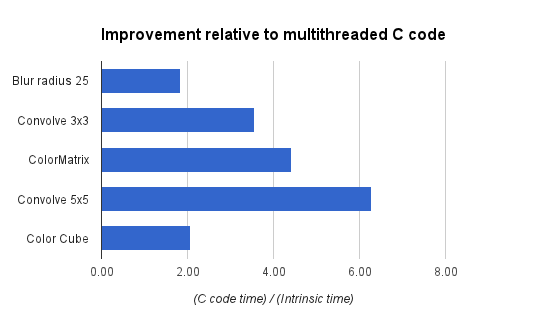
What do developers get from the tuning that we’ve done? On the new Nexus 7, running that same 25-pixel radius Gaussian blur on a 1.6 megapixel image takes about 176ms. A simpler intrinsic like the color matrix operation takes under 4ms. The intrinsics are typically 2-3x faster than a multithreaded C implementation and often 10x+ faster than a Java implementation. Pretty good for eight lines of code.


Renderscript optimizations chartstyle="border:1px solid #ddd;border-radius: 6px;" />

Figure 1. Performance gains with RenderScript intrinsics, relative to equivalent multithreaded C implementations.


Applications that need additional functionality can mix these intrinsics with their own RenderScript kernels. An example of this would be an application that is taking camera preview data, converting it from YUV to RGB, adding a vignette effect, and uploading the final image to a SurfaceView for display.


In this example, we’ve got a stream of data flowing between a source device (the camera) and an output device (the display) with a number of possible processors along the way. Today, these operations can all run on the CPU, but as architectures become more advanced, using other processors becomes possible.


For example, the vignette operation can happen on a compute-capable GPU (like the ARM Mali T604 in the Nexus 10), while the YUV to RGB conversion could happen directly on the camera’s image signal processor (ISP). Using these different processors could significantly improve power consumption and performance. As more these processors become available, future Android updates will enable RenderScript to run on these processors, and applications written for RenderScript today will begin to make use of those processors transparently, without any additional work for developers.


Intrinsics provide developers a powerful tool they can leverage with minimal effort to achieve great performance across a wide variety of hardware. They can be mixed and matched with general purpose developer code allowing great flexibility in application design. So next time you have performance issues with image manipulation, I hope you give them a look to see if they can help.


Wednesday 28 August 2013

Respecting Audio Focus


Posted by Kristan Uccello, Google Developer Relations


It’s rude to talk during a presentation, it disrespects the speaker and annoys the audience. If your application doesn’t respect the rules of audio focus then it’s disrespecting other applications and annoying the user. If you have never heard of audio focus you should take a look at the Android developer training material.

With multiple apps potentially playing audio it's important to think about how they should interact. To avoid every music app playing at the same time, Android uses audio focus to moderate audio playback—your app should only play audio when it holds audio focus. This post provides some tips on how to handle changes in audio focus properly, to ensure the best possible experience for the user.


Requesting audio focus


Audio focus should not be requested when your application starts (don’t get greedy), instead delay requesting it until your application is about to do something with an audio stream. By requesting audio focus through the AudioManager system service, an application can use one of the AUDIOFOCUS_GAIN* constants (see Table 1) to indicate the desired level of focus.


Listing 1. Requesting audio focus.


1. AudioManager am = (AudioManager) mContext.getSystemService(Context.AUDIO_SERVICE);
2.
3. int result = am.requestAudioFocus(mOnAudioFocusChangeListener,
4. // Hint: the music stream.
5. AudioManager.STREAM_MUSIC,
6. // Request permanent focus.
7. AudioManager.AUDIOFOCUS_GAIN);
8. if (result == AudioManager.AUDIOFOCUS_REQUEST_GRANTED) {
9. mState.audioFocusGranted = true;
10. } else if (result == AudioManager.AUDIOFOCUS_REQUEST_FAILED) {
11. mState.audioFocusGranted = false;
12. }


In line 7 above, you can see that we have requested permanent audio focus. An application could instead request transient focus using AUDIOFOCUS_GAIN_TRANSIENT which is appropriate when using the audio system for less than 45 seconds.


Alternatively, the app could use AUDIOFOCUS_GAIN_TRANSIENT_MAY_DUCK, which is appropriate when the use of the audio system may be shared with another application that is currently playing audio (e.g. for playing a "keep it up" prompt in a fitness application and expecting background music to duck during the prompt). The app requesting AUDIOFOCUS_GAIN_TRANSIENT_MAY_DUCK should not use the audio system for more than 15 seconds before releasing focus.


Handling audio focus changes


In order to handle audio focus change events, an application should create an instance of OnAudioFocusChangeListener. In the listener, the application will need to handle theAUDIOFOCUS_GAIN* event and AUDIOFOCUS_LOSS* events (see Table 1). It should be noted that AUDIOFOCUS_GAIN has some nuances which are highlighted in Listing 2, below.


Listing 2. Handling audio focus changes.


1. mOnAudioFocusChangeListener = new AudioManager.OnAudioFocusChangeListener() {  
2.
3. @Override
4. public void onAudioFocusChange(int focusChange) {
5. switch (focusChange) {
6. case AudioManager.AUDIOFOCUS_GAIN:
7. mState.audioFocusGranted = true;
8.
9. if(mState.released) {
10. initializeMediaPlayer();
11. }
12.
13. switch(mState.lastKnownAudioFocusState) {
14. case UNKNOWN:
15. if(mState.state == PlayState.PLAY && !mPlayer.isPlaying()) {
16. mPlayer.start();
17. }
18. break;
19. case AudioManager.AUDIOFOCUS_LOSS_TRANSIENT:
20. if(mState.wasPlayingWhenTransientLoss) {
21. mPlayer.start();
22. }
23. break;
24. case AudioManager.AUDIOFOCUS_LOSS_TRANSIENT_CAN_DUCK:
25. restoreVolume();
26. break;
27. }
28.
29. break;
30. case AudioManager.AUDIOFOCUS_LOSS:
31. mState.userInitiatedState = false;
32. mState.audioFocusGranted = false;
33. teardown();
34. break;
35. case AudioManager.AUDIOFOCUS_LOSS_TRANSIENT:
36. mState.userInitiatedState = false;
37. mState.audioFocusGranted = false;
38. mState.wasPlayingWhenTransientLoss = mPlayer.isPlaying();
39. mPlayer.pause();
40. break;
41. case AudioManager.AUDIOFOCUS_LOSS_TRANSIENT_CAN_DUCK:
42. mState.userInitiatedState = false;
43. mState.audioFocusGranted = false;
44. lowerVolume();
45. break;
46. }
47. mState.lastKnownAudioFocusState = focusChange;
48. }
49.};


AUDIOFOCUS_GAIN is used in two distinct scopes of an applications code. First, it can be used when registering for audio focus as shown in Listing 1. This does NOT translate to an event for the registered OnAudioFocusChangeListener, meaning that on a successful audio focus request the listener will NOT receive an AUDIOFOCUS_GAIN event for the registration.


AUDIOFOCUS_GAIN is also used in the implementation of an OnAudioFocusChangeListener as an event condition. As stated above, the AUDIOFOCUS_GAIN event will not be triggered on audio focus requests. Instead the AUDIOFOCUS_GAIN event will occur only after an AUDIOFOCUS_LOSS* event has occurred. This is the only constant in the set shown Table 1 that is used in both scopes.


There are four cases that need to be handled by the focus change listener. When the application receives an AUDIOFOCUS_LOSS this usually means it will not be getting its focus back. In this case the app should release assets associated with the audio system and stop playback. As an example, imagine a user is playing music using an app and then launches a game which takes audio focus away from the music app. There is no predictable time for when the user will exit the game. More likely, the user will navigate to the home launcher (leaving the game in the background) and launch yet another application or return to the music app causing a resume which would then request audio focus again.


However another case exists that warrants some discussion. There is a difference between losing audio focus permanently (as described above) and temporarily. When an application receives an AUDIOFOCUS_LOSS_TRANSIENT, the behavior of the app should be that it suspends its use of the audio system until it receives an AUDIOFOCUS_GAIN event. When the AUDIOFOCUS_LOSS_TRANSIENT occurs, the application should make a note that the loss is temporary, that way on audio focus gain it can reason about what the correct behavior should be (see lines 13-27 of Listing 2).


Sometimes an app loses audio focus (receives an AUDIOFOCUS_LOSS) and the interrupting application terminates or otherwise abandons audio focus. In this case the last application that had audio focus may receive an AUDIOFOCUS_GAIN event. On the subsequent AUDIOFOCUS_GAIN event the app should check and see if it is receiving the gain after a temporary loss and can thus resume use of the audio system or if recovering from an permanent loss, setup for playback.


If an application will only be using the audio capabilities for a short time (less than 45 seconds), it should use an AUDIOFOCUS_GAIN_TRANSIENT focus request and abandon focus after it has completed its playback or capture. Audio focus is handled as a stack on the system — as such the last process to request audio focus wins.


When audio focus has been gained this is the appropriate time to create a MediaPlayer or MediaRecorder instance and allocate resources. Likewise when an app receives AUDIOFOCUS_LOSS it is good practice to clean up any resources allocated. Gaining audio focus has three possibilities that also correspond to the three audio focus loss cases in Table 1. It is a good practice to always explicitly handle all the loss cases in the OnAudioFocusChangeListener.


Table 1. Audio focus gain and loss implication.


GAINLOSS
AUDIOFOCUS_GAINAUDIOFOCUS_LOSS
AUDIOFOCUS_GAIN_TRANSIENTAUDIOFOCUS_LOSS_TRANSIENT
AUDIOFOCUS_GAIN_TRANSIENT_MAY_DUCKAUDIOFOCUS_LOSS_TRANSIENT_CAN_DUCK


Note: AUDIOFOCUS_GAIN is used in two places. When requesting audio focus it is passed in as a hint to the AudioManager and it is used as an event case in the OnAudioFocusChangeListener. The gain events highlighted in green are only used when requesting audio focus. The loss events are only used in the OnAudioFocusChangeListener.


Table 2. Audio stream types.


Stream TypeDescription
STREAM_ALARMThe audio stream for alarms
STREAM_DTMFThe audio stream for DTMF Tones
STREAM_MUSICThe audio stream for "media" (music, podcast, videos) playback
STREAM_NOTIFICATIONThe audio stream for notifications
STREAM_RINGThe audio stream for the phone ring
STREAM_SYSTEMThe audio stream for system sounds


An app will request audio focus (see an example in the sample source code linked below) from the AudioManager (Listing 1, line 1). The three arguments it provides are an audio focus change listener object (optional), a hint as to what audio channel to use (Table 2, most apps should use STREAM_MUSIC) and the type of audio focus from Table 1, column 1. If audio focus is granted by the system (AUDIOFOCUS_REQUEST_GRANTED), only then handle any initialization (see Listing 1, line 9).


Note: The system will not grant audio focus (AUDIOFOCUS_REQUEST_FAILED) if there is a phone call currently in process and the application will not receive AUDIOFOCUS_GAIN after the call ends.


Within an implementation of OnAudioFocusChange(), understanding what to do when an application receives an onAudioFocusChange() event is summarized in Table 3.


In the cases of losing audio focus be sure to check that the loss is in fact final. If the app receives an AUDIOFOCUS_LOSS_TRANSIENT or AUDIOFOCUS_LOSS_TRANSIENT_CAN_DUCK it can hold onto the media resources it has created (don’t call release()) as there will likely be another audio focus change event very soon thereafter. The app should take note that it has received a transient loss using some sort of state flag or simple state machine.


If an application were to request permanent audio focus with AUDIOFOCUS_GAIN and then receive an AUDIOFOCUS_LOSS_TRANSIENT_CAN_DUCK an appropriate action for the application would be to lower its stream volume (make sure to store the original volume state somewhere) and then raise the volume upon receiving an AUDIOFOCUS_GAIN event (see Figure 1, below).


Table 3. Appropriate actions by focus change type.


Focus Change TypeAppropriate Action
AUDIOFOCUS_GAINGain event after loss event: Resume playback of media unless other state flags set by the application indicate otherwise. For example, the user paused the media prior to loss event.
AUDIOFOCUS_LOSSStop playback. Release assets.
AUDIOFOCUS_LOSS_TRANSIENTPause playback and keep a state flag that the loss is transient so that when the AUDIOFOCUS_GAIN event occurs you can resume playback if appropriate. Do not release assets.
AUDIOFOCUS_LOSS_TRANSIENT_CAN_DUCKLower volume or pause playback keeping track of state as with AUDIOFOCUS_LOSS_TRANSIENT. Do not release assets.


Conclusion and further reading


Understanding how to be a good audio citizen application on an Android device means respecting the system's audio focus rules and handling each case appropriately. Try to make your application behave in a consistent manner and not negatively surprise the user. There is a lot more that can be talked about within the audio system on Android and in the material below you will find some additional discussions.


Example source code is available here:


https://android.googlesource.com/platform/development/+/master/samples/RandomMusicPlayer


Followers